1(a). Verification(Eligibility check):
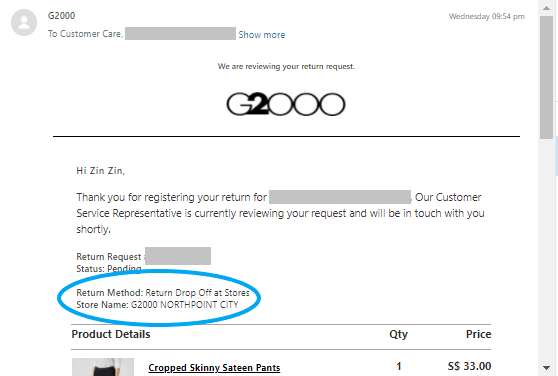
Upon receiving the ticket, verify the 'Return Method' and make sure it is 'Return Drop Off at Stores'. Carry out the usual investigation.
Reference: Return eligibility
1(b). Verification(No RMA raised by customer):
In the event that the customer visits the store and returns the items without raising the RMA, retail staff will fill the blue section of the Store Drop-off's tracker:
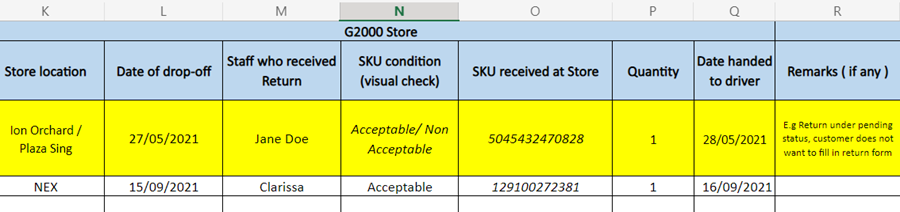
CS to manually create an RMA. Follow the guidelines from New RMA Creation.
2. Authorisation:
Once the investigation has been conducted, CS can proceed with authorizing the return request.
|
Work Instructions
|
Magento/Zendesk
|
|
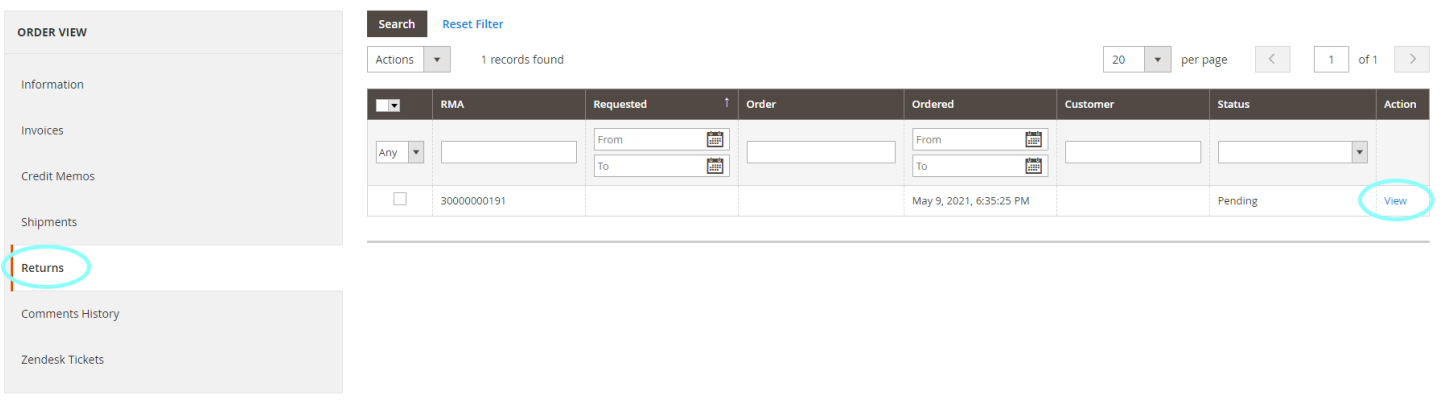
Step 1:
1. In the Order ID page, click 'Returns' under order view.
2. Select 'view' on the RMA.
3. In the RMA page, click 'Return Items' under Return Information.
|
|
|
Step 2: Select the correct product and fill in the fields as below:
- Authorised = Fill in the Quantity
- Resolution = Do not change. Retain as 'Refund'
- Status = Select 'Authorised'
- Tick Notify Customer by email
and click 'SAVE'
|

|
|
Step 3: Go back to the ticket, write 'Authorised' on the 'Internal Note', and submit it as 'On-Hold'. No email needed to send to the customer.
Note: Customer has 7 days to return the item. Unofficially, if the customer does not return the item within 7 days, there will be another 7 days extension, subject to approval.
|

|
|
Step 4: Go to the Store Drop-off's tracker and update the necessary details in the CS(Green columns):
- Agent
- Date
- Ticket #
- Order ID
- RMA
- SKU
- Quantity
- Condition indicated by customer(if applicable)
14 days window from the RMA request's date
|

Reference: Store Drop-off's Tracker
|
|
3. QC Accepted:
Once DC updates the consolidated file status as 'Acceptable' under QC remarks, CS can proceed to authorize the refund as below after . If QC remarks falls under 'Unacceptable', click here to proceed with the refund process.
QC Accepted= Item received and in good condition
 |
|
Work Instructions
|
Magento/Zendesk
|
|
Step 1:
1. In the Order ID page, click 'Returns' under order view.
2. Select 'view' on the RMA.
3. In the RMA page, click 'Return Items' under Return Information.
|
|
|
Step 2: Select the correct product and fill in the fields as below:
- Returned = Fill in the Quantity
- Resolution = Do not change. Retain as 'Refund'
- Status = Select Return Received
- Tick Notify Customer by email.
|

|
|
Step 3: Under the same RMA page, Click on 'Details' and fill in the attributes as below:
- SKU Condition =Select the condition based on the remarks by DC
- Remarks = Select 'Approved - refund will be processed'
- Write Off = Select 'No'
- Refund Item = Select 'Yes'
- Refund Shipping = Select 'No'
Click 'SAVE & CONTINUE EDIT'
|


|
|
Step 4: Update the RMA comment text.
1. In the RMA page, click 'General Information' under Returns Information
2. Fill in the RMA comment in the 'RMA History Comment Text' field
RMA History Comment
Zendesk ticket#:
Reason for return: (detailed specific reason.
Return quantity to stock: (Yes/No)
|

|
|
Step 5: TO BE PERFORMED BY FINANCE ONLY!
Finance to perform refund once the status changes to 'Return Received'. FIN usually will take 1 business day to process the refund.
Finance to fill in:
- Approved = Fill in the Quantity
- Resolution = Do not change. Retain as 'Refund'
- Status = Select 'Approved' to indicate that refund is completed and status will change to ‘Processed and Closed’
|
 |
|
Step 6: Email customer the refund confirmation and click 'Submit as Solved'
*Refund amount = Sum up the raw total of returned item(s)
|
Macro for email response
Return/Refund::Refunded::Normal
|
|

Comments
0 comments
Article is closed for comments.